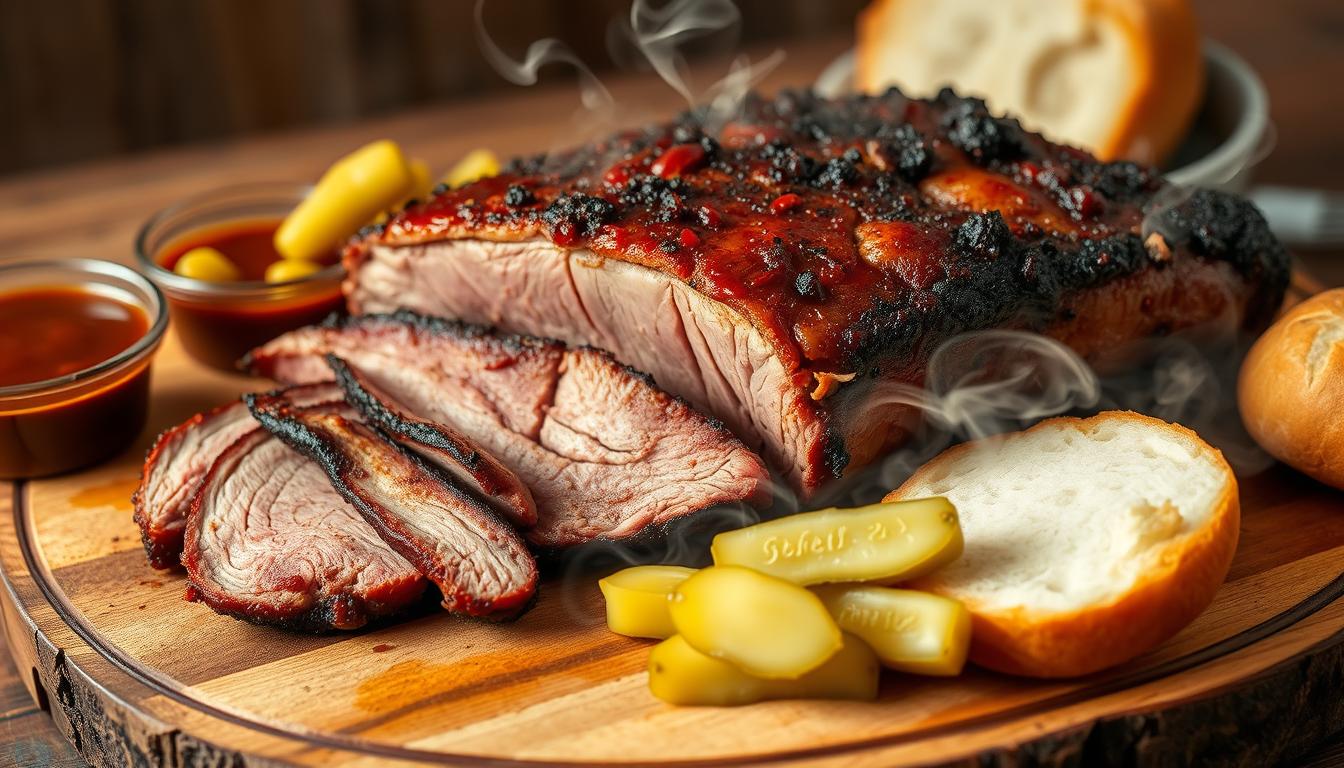
How to Smoke Brisket: Easy Smoked Brisket Recipes at Home
Ever wondered why a perfectly smoked brisket is the star of every barbecue? The secret lies in the balance of flavor, tenderness, and the right amount of smoke. With the right smoked brisket recipes and techniques, you can achieve that “melt-in-your-mouth” texture right in your backyard.
This guide will walk you through everything you need to know, from selecting the best cut of beef to mastering the art of slicing and serving. Inspired by authentic Texas barbecue traditions, we’ll show you how to create a dish that’s both impressive and approachable.
Choosing quality meat is the first step. A full packer brisket, with its rich marbling, ensures a juicy and tender result. The process may take time, but the rewards are worth every minute. Whether you’re a beginner or a seasoned pitmaster, this guide is designed to make your cooking experience seamless and enjoyable.
Table of Contents
Key Takeaways
- Select a full packer brisket for the best results.
- Balance flavor, tenderness, and smoke for a perfect dish.
- Follow authentic Texas barbecue techniques for inspiration.
- Allow ample time for cooking and resting the meat.
- Use simple, high-quality ingredients for seasoning.
Introduction to Smoking Brisket at Home
Bringing the art of barbecue home starts with mastering the basics of low and slow cooking. This method transforms tough cuts of meat into tender, flavorful masterpieces. With the right techniques, you can recreate competition-level results in your backyard.
Smoking meat is all about patience and consistency. The process involves cooking at a low temperature—around 240°F—for an extended period, often 16 to 20 hours. This allows the connective tissues to break down, resulting in a melt-in-your-mouth texture.
One of the most critical aspects is managing the internal temperature. The meat should reach at least 200°F for optimal tenderness. During the cooking process, you’ll encounter a “stall” around 160°F, where the temperature plateaus. This is normal and part of the magic of smoking.
Seasoning plays a vital role in developing a robust bark—the flavorful crust on the outside of the meat. A simple rub of salt, pepper, and spices can elevate the flavor profile significantly. As the meat cooks, the bark forms, sealing in juices and adding depth to every bite.
“Low and slow cooking isn’t just a method; it’s a commitment to quality and flavor.”
Here’s a quick overview of the key steps:
- Preheat your smoker to 240°F.
- Season the meat generously with your chosen rub.
- Cook until the internal temperature reaches 200°F, allowing for the stall.
- Rest the meat for at least an hour before slicing.
By following these established techniques, you’ll achieve a tender, flavorful result every time. Whether you’re a beginner or a seasoned pitmaster, these tips will help you master the art of smoking at home.
| Step | Details |
|---|---|
| Preheat Smoker | Set to 240°F for consistent heat. |
| Season Meat | Use a simple rub for maximum flavor. |
| Cook Time | 16-20 hours, monitoring internal temperature. |
| Resting | Allow at least 1 hour before slicing. |
Understanding Your Brisket: Anatomy and Selection
Understanding the anatomy of your meat is key to achieving the perfect cook. A brisket consists of two main muscles: the flat and the point. Each has unique characteristics that affect the cooking process and final result.
Read Also:
Simple And Delicious Tater Tot Casserole Recipe
Top 10 Chicken and Potatoes Recipes – Easy and Delicious Meals
Easy Korean Ground Beef Bowl: Flavor-Packed Meal
Marry Me Chicken Pasta Recipe – Easy & Delicious
Recognizing the Flat and the Point
The flat is leaner and more uniform in thickness, making it easier to cook evenly. The point, on the other hand, has more fat and connective tissue, which contributes to its rich flavor and tenderness. Knowing the difference helps you tailor your cooking approach for each section.
The fat cap, a layer of fat on one side of the meat, plays a crucial role. It helps retain moisture and adds flavor during the cooking process. Trimming it to the right thickness—about 1/4 inch—ensures optimal results.
Choosing a Full Packer Cut
A whole packer brisket includes both the flat and the point, offering the best of both worlds. It’s cost-effective and delivers superior taste when trimmed properly. When selecting, look for even thickness and good marbling, which indicates tenderness and flavor.
Here’s a quick guide to help you choose the right cut:
| Feature | Details |
|---|---|
| Fat Cap | 1/4 inch thickness for moisture retention |
| Marbling | Even distribution for tenderness |
| Flexibility | Indicates tenderness |
| Weight | 12-18 pounds for a full packer |
By understanding the anatomy and selecting the right cut, you set the stage for a successful cooking experience. Quality meat, combined with proper trimming, ensures a flavorful and tender result every time.
Choosing the Right Smoked Brisket Recipes
Finding the perfect recipe for your barbecue can make all the difference. Whether you’re a beginner or a seasoned pitmaster, selecting the right approach ensures a flavorful and tender result. Texas-style barbecue, known for its simplicity and bold flavors, is a great place to start.
When choosing a method, consider your equipment and desired flavor profile. Some prefer the traditional low-and-slow approach, while others experiment with techniques like the “Texas crutch”. This method involves wrapping the meat in foil or butcher paper to speed up cooking and retain moisture.
Seasoning plays a key role in enhancing the taste. A simple rub of salt, pepper, and spices can create a robust bark, while sauces add a tangy finish. Texas barbecue often focuses on letting the meat’s natural flavors shine, so keep it minimal yet impactful.
Here’s a quick guide to help you decide:
- Traditional Texas Style: Salt, pepper, and smoke for a classic flavor.
- Wrapped Method: Use foil or butcher paper to lock in moisture.
- Flavor Variations: Experiment with rubs and sauces to suit your taste.
Remember, flexibility is key. Your choice of recipe should align with your tools and preferences. Whether you’re aiming for a competition-level dish or a simple backyard cookout, the right method ensures success.
Preparing Your Workspace and Tools
Setting up your workspace correctly is the foundation of a successful barbecue. A well-organized area ensures efficiency and safety, making the entire process smoother. Whether you’re a beginner or a seasoned pitmaster, having the right tools and setup is crucial.
Essential Equipment and Safety Tips
Start by gathering the necessary tools. A reliable smoker is the centerpiece of your setup. Brands like CampChef SmokePro are highly recommended for their consistency and ease of use. You’ll also need a large cutting board, a sharp chef’s knife like the Dahstrong Chef Knife, and a quality meat thermometer to monitor internal temperatures.
Safety is paramount. Always ensure your workspace is clean and free of clutter. Sharp knives and hot surfaces require careful handling. Keep a fire extinguisher nearby, especially when working with a smoker or open flame.
Organize your tools in a way that allows easy access. You’ll need space for trimming, seasoning, and later slicing the beef brisket. A well-arranged workspace ensures you can focus on the cook without unnecessary interruptions.
Here’s a quick checklist to get started:
- Reliable smoker (e.g., CampChef SmokePro)
- Large cutting board
- Sharp chef’s knife (e.g., Dahstrong Chef Knife)
- Quality meat thermometer
- Butcher paper or foil for wrapping
Consistent temperatures are key to a successful cook. Ensure your smoker is preheated and maintained at the right level throughout the process. A well-prepared workspace and the right tools make all the difference in achieving that perfect result.
Mastering the Art of Trimming Your Brisket
Proper trimming is the secret to even cooking and a juicy finish. It’s not just about removing excess fat; it’s about shaping the meat for consistent heat distribution and flavor. A well-trimmed piece ensures every bite is tender and packed with taste.
Trimming the Fat Cap and Deckle
The fat cap is a protective layer on the meat that helps retain moisture during cooking. Trimming it to about ¼ inch ensures it renders properly without overpowering the flavor. Use a sharp knife to carefully remove the outer hard fat, known as the deckle, which doesn’t break down during cooking.
Balancing fat removal is key. Too much fat can lead to uneven cooking, while too little can dry out the meat. Aim for a uniform layer that protects the meat while allowing the rub to form a flavorful bark.
Achieving the Ideal Thickness
Uniform thickness is crucial for even cooking. Start by trimming the edges to create a streamlined shape. This helps the meat cook consistently, preventing dry spots or undercooked areas.
Pay attention to the point and flat muscles. The point has more fat and connective tissue, while the flat is leaner. Trimming these sections carefully ensures both parts cook evenly and stay tender.
“Trimming isn’t just a step; it’s an art that transforms tough cuts into tender masterpieces.”
Here’s a quick guide to trimming:
| Step | Details |
|---|---|
| Trim Fat Cap | Reduce to ¼ inch for optimal rendering. |
| Remove Deckle | Cut away the hard, dense fat layer. |
| Shape Uniformly | Create even edges for consistent cooking. |
| Balance Fat | Keep enough fat to protect the meat. |
Mastering trimming takes practice, but the results are worth it. A well-trimmed piece of meat ensures a tender, flavorful dish that’s sure to impress.
Essential Seasoning and Rub Techniques
The foundation of a flavorful brisket lies in the seasoning and rub techniques you use. A bold rub not only enhances taste but also helps form the coveted smoke ring. This step is crucial for locking in moisture and creating a robust bark.
Binder Choices and Application Methods
Binders like yellow mustard are essential for helping the rub adhere to the meat. They create a sticky surface, ensuring the seasoning stays in place during the cook. Apply the binder evenly across the entire surface, including the fat side and lean side.
Mustard is a popular choice because it’s neutral in flavor and doesn’t overpower the meat. Other options include olive oil or even water. The key is to use just enough to coat the surface without drowning it.
Mixing the Perfect Dry Rub
A classic dry rub combines kosher salt, coarse black pepper, and granulated garlic. Texas pitmasters often use a 50/50 ratio of salt and pepper, known as the Dalmatian rub. This simple blend lets the natural flavors of the beef shine.
For added depth, you can include smoked paprika, onion powder, or ground coriander. Mix the ingredients thoroughly to ensure even distribution. Store your rub in an airtight container for up to a month to maintain freshness.
“A well-mixed rub is the cornerstone of a flavorful brisket.”
When applying the rub, be generous. Cover every inch of the meat, ensuring the seasoning penetrates deeply. This step is vital for developing the final bark and enhancing the overall flavor.
| Step | Details |
|---|---|
| Choose Binder | Yellow mustard, olive oil, or water. |
| Mix Rub | Kosher salt, black pepper, garlic, optional spices. |
| Apply Generously | Cover all sides, including fat and lean areas. |
| Store Properly | Keep in an airtight container for up to a month. |
By mastering these techniques, you’ll elevate your brisket to new heights. The right seasoning and rub ensure a flavorful, tender result every time.
Getting Your Smoker Set Up for Low and Slow Cooking
Setting up your smoker correctly is the first step to achieving a tender and flavorful result. A well-prepared smoker ensures even cooking and a deep smoky flavor. Start by preheating it to a consistent temperature between 225°F and 275°F. This range is ideal for breaking down connective tissues and rendering fat safely.
Low and slow cooking is all about patience and precision. Maintaining a steady temperature allows the meat to cook evenly, preventing dry spots or undercooked areas. Use a reliable thermometer to monitor the internal temperature throughout the process. This ensures your whole packer reaches the ideal doneness without overcooking.
Consistent heat control is crucial. Fluctuations in temperature can disrupt the cooking process, leading to uneven results. Keep your smoker’s vents adjusted to maintain airflow and stability. This helps develop a robust bark and enhances the smoky flavor.
“A well-set smoker is the cornerstone of achieving a deep smoky flavor and tender brisket.”
Choosing the right wood also plays a significant role. Oak and cherry are popular options, offering a balanced smoke that complements the meat without overpowering it. Experiment with different woods to find your preferred flavor profile.
Here’s a quick guide to setting up your smoker:
- Preheat to 225-275°F for consistent cooking.
- Monitor internal temperature using a reliable thermometer.
- Adjust vents to maintain steady airflow and heat.
- Use oak or cherry wood for a balanced smoky flavor.
By following these steps, you’ll create a well-prepared smoker that delivers tender, flavorful results every time. Whether you’re cooking a whole packer or experimenting with different cuts, a properly set smoker is your key to success.
The Smoking Process: Step-by-Step Basics
Mastering the smoking process is all about patience and precision. It’s a method that transforms tough cuts into tender, flavorful results. By following these step-by-step basics, you’ll achieve a predictable, mouth-watering product every time.
Preheating and Maintaining Smoker Temperatures
Start by preheating your smoker to a consistent temperature between 225°F and 275°F. This range is ideal for breaking down connective tissues and rendering fat safely. Use a reliable thermometer to monitor the internal temperature throughout the process.
Consistent heat control is crucial. Fluctuations in temperature can disrupt the cooking process, leading to uneven results. Keep your smoker’s vents adjusted to maintain airflow and stability. This helps develop a robust bark and enhances the smoky flavor.

During the first few hours, trust the process. Leave the meat undisturbed to allow the smoke to fully penetrate. This is when the magic happens, and the smoke ring begins to form—a prized aesthetic quality in a well-smoked dish.
“Patience is the secret ingredient in every successful smoke.”
Here’s a clear timeline to guide you:
- Preheat: Set your smoker to 225-275°F and let it stabilize for 30-45 minutes.
- Initial Smoke: Place the meat in the smoker and leave it untouched for the first 3-4 hours.
- Spritzing: After the initial period, spritz the meat every 45 minutes to retain moisture.
- Monitor: Keep an eye on the internal temperature, aiming for 200°F for optimal tenderness.
By following these steps, you’ll create a well-smoked dish that’s both tender and flavorful. Whether you’re a beginner or a seasoned pitmaster, these basics ensure success every time.
Overcoming the Stall: Managing Internal Temperature
The stall is a natural part of the cooking process that can test your patience but is essential for perfect results. It occurs when the internal temperature of your meat plateaus, often around 160°F to 170°F. This happens due to evaporative cooling, where moisture on the surface of the meat evaporates, slowing down the cooking process.
Understanding the stall is key to achieving a tender and flavorful outcome. During this phase, the meat’s look and feel can be better indicators of readiness than temperature alone. The bark, or crust, forms during this time, adding depth to the flavor.
To manage the stall without compromising the bark, consider these strategies:
- Increase the smoker’s temperature slightly to shorten the stall duration. This helps maintain momentum without drying out the meat.
- Wrap the meat in butcher paper or foil to retain moisture and speed up the cooking process. This technique, known as the Texas Crutch, is especially useful for large cuts.
- Monitor the internal temperature continuously using a reliable thermometer. This ensures you don’t overcook or undercook the meat.
“Patience is the secret ingredient in every successful smoke. Trust the process, and the results will follow.”
Wrapping the meat is a common solution, but timing is crucial. Wrap too early, and you risk losing the bark’s texture. Wrap too late, and the meat may dry out. Aim to wrap when the bark is well-formed, usually after 4-6 hours of cooking.
Here’s a quick guide to managing the stall:
| Step | Details |
|---|---|
| Monitor Temperature | Use a thermometer to track internal heat. |
| Adjust Smoker Heat | Increase slightly to shorten the stall. |
| Wrap the Meat | Use butcher paper or foil to retain moisture. |
| Be Patient | Allow the process to unfold naturally. |
By understanding and managing the stall, you’ll achieve a perfectly cooked dish every time. Patience and precision are your best tools in this phase of the cook.
The Texas Crutch: Wrapping with Butcher Paper vs Foil
The Texas Crutch method is a game-changer for achieving tender, juicy results in barbecue. Wrapping your meat during the smoking process helps push it through the stall, ensuring even cooking and optimal flavor. But should you use butcher paper or foil? Let’s break it down.
Benefits of Butcher Paper
Butcher paper is a favorite among pitmasters for its ability to let the meat breathe. Unlike foil, it preserves the bark’s integrity while still locking in moisture. This balance is key to achieving a crispy exterior and a juicy interior.
Experts recommend pink butcher paper for its durability and neutral flavor. It’s also easier to handle than foil, making it a practical choice for both beginners and pros.
When to Wrap Your Brisket
Timing is everything when it comes to wrapping. Most pitmasters suggest wrapping your meat when it reaches an internal temperature of 165°F to 175°F. This is typically during the stall, when the temperature plateaus and the bark has formed.
Wrapping too early can soften the bark, while wrapping too late may dry out the meat. Keep an eye on the cap—the layer of fat on the brisket—as it plays a crucial role in moisture retention.
“Wrapping isn’t just a step; it’s a strategy for achieving the perfect balance of flavor and texture.”
Here’s a quick comparison of the two methods:
- Butcher Paper: Preserves bark, allows breathing, and maintains moisture.
- Foil: Speeds up cooking, locks in moisture, but can soften the bark.
By choosing the right wrap and timing it correctly, you’ll achieve a perfectly cooked brisket every time. Whether you prefer the traditional approach or the Texas Crutch, the key is patience and precision.
Monitoring Temperature: Tools and Techniques
Accurate temperature monitoring is the backbone of achieving a perfectly cooked dish. Whether you’re a beginner or a seasoned pitmaster, using the right tools ensures consistent results. Reliable thermometers, like the Thermapen Mk4, are essential for tracking the internal temperature of your meat. This step is crucial for knowing when to wrap or remove it from the smoker.
Using Thermapens and Probes Effectively
Thermometers and probes are your best allies in low-and-slow cooking. The Thermapen Mk4, known for its speed and accuracy, provides instant readings. Probes, on the other hand, allow you to monitor the temperature continuously without opening the smoker. This minimizes heat loss and ensures a steady cooking process.
Placement is key for accurate readings. Insert the probe into the thickest part of the meat, avoiding fat or bone. This ensures you’re measuring the true internal temperature, which is critical for determining doneness.
“Precision in temperature monitoring is the difference between good and great barbecue.”
Common mistakes include relying on analog thermometers or placing probes incorrectly. Digital tools like the Thermapen Mk4 eliminate guesswork, providing reliable data every time. Investing in quality equipment ensures reproducible, expert-level results.
Here’s a quick guide to using temperature tools effectively:
| Tool | Usage |
|---|---|
| Thermapen Mk4 | Instant, accurate readings for spot checks. |
| Probes | Continuous monitoring without opening the smoker. |
| Placement | Insert into the thickest part, avoiding fat or bone. |
| Common Mistakes | Relying on analog tools or incorrect placement. |
By mastering these techniques, you’ll achieve a perfectly cooked dish every time. The right tools and precise monitoring pave the way for tender, flavorful results.
Resting and Slicing Your Brisket for Maximum Flavor
The final steps of resting and slicing are where your barbecue masterpiece truly comes to life. These techniques ensure every bite is tender, juicy, and packed with flavor. Skipping these steps can lead to dry, tough results, so patience is key.
Recommended Resting Techniques
Resting your meat is non-negotiable. After cooking, let it rest for at least one hour. This allows the juices to redistribute, ensuring a moist and flavorful dish. Wrap it in butcher paper or foil and place it in a cooler or warm oven to maintain the ideal temperature of around 200°F.

During this time, the fibers relax, making the meat easier to slice. Rushing this step can cause the juices to escape, leaving you with a dry result. Trust the process—your patience will be rewarded.
How to Slice Against the Grain
Slicing against the grain is the secret to achieving a buttery-smooth texture. The grain refers to the direction of the muscle fibers. Cutting perpendicular to these fibers shortens them, making each bite more tender.
Start by identifying the grain direction in the flat and the point. The flat has a more consistent grain, while the point’s fibers run in a different direction. Use a sharp knife to slice the meat into 1/4-inch thick pieces for the perfect balance of texture and presentation.
“Slicing against the grain transforms tough fibers into tender, melt-in-your-mouth bites.”
Here’s a quick guide to slicing:
- Identify the grain direction in both the flat and the point.
- Use a sharp knife for clean, precise cuts.
- Slice against the grain at a 90-degree angle.
- Aim for 1/4-inch thickness for optimal tenderness.
By mastering these techniques, you’ll elevate your barbecue to new heights. Proper resting and precise slicing ensure a dish that’s as beautiful as it is delicious.
Enhancing Authentic Texas Flavor Profiles
Texas barbecue is more than a cooking style; it’s a celebration of bold, uncomplicated flavors. The focus is on letting the meat shine, enhanced by smoke and seasoning. To elevate your bbq, consider subtle tweaks to traditional methods while staying true to the core principles of Texas barbecue.
Start with the classic salt and pepper rub, but don’t be afraid to experiment. Adding smoked paprika, garlic powder, or even a hint of cayenne can create a richer flavor profile. These adjustments complement the natural taste of the meat without overpowering it.
Wood selection also plays a crucial role. Oak and hickory are staples in Texas barbecue, offering a balanced smoke. For a unique twist, try cherry or pecan wood. These options add a subtle sweetness that enhances the flavor without masking the meat’s natural richness.
“The secret to great barbecue lies in the balance of smoke, seasoning, and simplicity.”
Here are some techniques to enhance your bbq:
- Adjust your rub: Add spices like coriander or mustard powder for depth.
- Experiment with wood: Mix oak with fruitwoods for a unique smoky taste.
- Control smoke levels: Too much smoke can overpower the meat; aim for a steady, light flow.
Refining your technique over time leads to personalized flavor profiles. Whether you stick to tradition or add your own twist, the key is to respect the essence of Texas barbecue. With patience and practice, you’ll create a dish that’s uniquely yours.
| Technique | Impact |
|---|---|
| Spice Rub Variations | Adds depth and complexity to the flavor. |
| Wood Selection | Enhances smoky notes without overpowering the meat. |
| Smoke Control | Ensures a balanced, not overwhelming, smoky taste. |
Variations and Troubleshooting in Brisket Cooking
Even the most experienced pitmasters face challenges when cooking brisket. From uneven cooking to dryness, these issues can test your patience. But with the right techniques, you can turn potential disasters into delicious successes.
Adapting to Different Cuts and Sizes
Not all briskets are created equal. The size and cut of your meat can significantly impact the cooking process. For larger cuts, adjust your smoking time to ensure even cooking. Smaller pieces may require less time but need careful monitoring to avoid overcooking.
Pay attention to the fat side. Trimming it to about ¼ inch ensures it renders properly, adding moisture and flavor. For uneven cuts, rotate the meat during cooking to promote even heat distribution.
Quick Fixes for Common Issues
Dryness is a common problem, but it’s fixable. If your meat feels dry, try wrapping it in butcher paper or foil to lock in moisture. This technique, known as the Texas Crutch, can rescue a troublesome cook.
For underdeveloped bark, check your seasoning. A generous rub of salt, pepper, and spices can enhance the crust. If the bark still isn’t forming, reduce spritzing and maintain a steady smoker temperature around 250°F.
“Every challenge in brisket cooking is an opportunity to learn and improve.”
Here are some quick tips for troubleshooting:
- Uneven Cooking: Rotate the meat and adjust heat zones in your smoker.
- Dryness: Wrap the meat in butcher paper or foil during the stall.
- Underdeveloped Bark: Increase seasoning and reduce spritzing.
Persistence and experimentation are key to mastering brisket cooking. By adapting to challenges and refining your techniques, you’ll achieve consistent, flavorful results every time.
Creative Uses for Leftover Smoked Brisket
Leftover brisket doesn’t have to be boring—it’s a canvas for creativity in the kitchen. With a little imagination, you can transform it into exciting new dishes that keep the smoky flavor alive. From hearty breakfasts to quick dinners, the possibilities are endless.
Repurposing leftovers not only prevents waste but also inspires further culinary exploration. The rich, smoky flavors developed during the initial cook make it a versatile ingredient. Whether you’re making sandwiches, tacos, or casseroles, the tenderness of the meat shines through.
- Brisket Quesadillas: Layer shredded meat with cheese and grill until crispy. Serve with salsa for a quick, satisfying meal.
- Breakfast Skillets: Dice the brisket and sauté with potatoes, eggs, and peppers for a protein-packed start to your day.
- Brisket Chili: Add chunks of meat to your favorite chili recipe for a smoky twist on a classic dish.
“Repurposing leftovers is a testament to the versatility of barbecue. It’s a chance to explore new flavors while honoring the effort of the initial cook.”
For a quick lunch, try a brisket grilled cheese sandwich. Layer thin slices of meat with melted cheese and grill until golden. The smoky flavor pairs perfectly with the gooey cheese.
If you’re in the mood for something hearty, whip up a batch of brisket stroganoff. The tender meat adds depth to the creamy sauce, making it a comforting meal in under 30 minutes.
Don’t forget about breakfast! A brisket breakfast burrito is a filling way to start your day. Wrap scrambled eggs, diced meat, and your favorite toppings in a warm tortilla for a portable meal.
By getting creative with your leftovers, you’ll continue the journey of mastering barbecue at home. Each dish is a chance to experiment and enjoy the fruits of your labor in new ways.
Secrets to a Perfect Bark and Smoke Ring
Mastering the art of barbecue means paying attention to the details that make a dish truly stand out. Two of the most sought-after features are a deeply caramelized bark and a pronounced smoke ring. These elements not only enhance flavor but also showcase your skill in low-and-slow cooking.
Achieving the Ideal Bark Texture
A perfect bark is crispy, flavorful, and never burnt. Start with a generous rub of salt, pepper, and spices to create a solid foundation. Maintain a steady smoker temperature around 250°F to ensure even cooking. Avoid excessive spritzing, as too much moisture can soften the crust.
Wrapping your meat in foil or butcher paper during the stall helps retain moisture while still allowing the bark to form. Timing is crucial—wrap too early, and the bark may not develop fully. Wrap too late, and the meat could dry out.
Techniques for a Strong Smoke Ring
The smoke ring is a hallmark of proper smoking technique. It forms when myoglobin in the meat reacts with carbon monoxide in the smoke. To achieve this, use wood like oak or hickory, which produce consistent smoke levels.
Keep the smoker temperature between 225°F and 250°F for optimal results. Avoid overly moist meats, as they can reduce the depth of the ring. Patience is key—low and slow cooking ensures the ring develops beautifully.
By focusing on these techniques, you’ll create a dish that’s as visually stunning as it is delicious. The perfect bark and smoke ring are the ultimate signs of barbecue mastery.